Excel Files
Microsoft Excel is a spreadsheet software with features that include calculation, graphing tools, and other advanced features, based on a simple layout using a grid of cells arranged in numbered rows and letter-named columns to organize data. Because of its simplicity, it is used to organize and manipulate data and perform arithmetic operations.
“Excel is the world’s most widely used spreadsheet software (…)” [1]
When developing new applications, a common backlog requirement is importing spreadsheet data into the application database. Or to download data from a database server into your computer using a spreadsheet layout.
In OutSystems applications, it is also possible to implement these features. In this article, I will show you how to export data to a spreadsheet and, conversely, how to import your data from a spreadsheet into your database.
As an example, I will use the Entity Employee, containing the following attributes (columns):

Quick-note: the examples in this article were developed in an OutSystems Web Reactive application, using the Service Studio version 11.8.12. If you would like to know more about OutSystems platforms and Service Studio developer tool, please follow the links:
Excel Inside Out
Scope
The Excel Inside Out application was created and shared on the Forge community to give you context and an example of “how you can follow a group of steps to Download and Upload data in OutSystems using an Excel structure.”
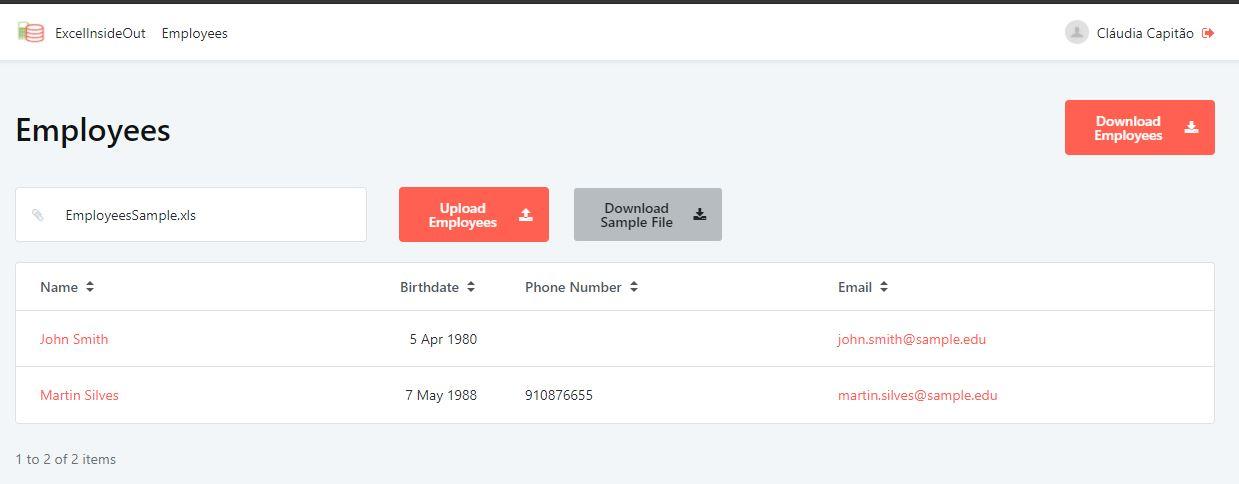
Once you download and open the application in your environment, you can explore it. The application has only two web screens:
- The Employees screen is your homepage. It lists all the employee’s records on the Employees Entity (image #1: Employee Entity). Besides the visual table on the homepage, you will have access to three buttons to execute the Inside Out excel logic.
- The second screen is the Employee Detail. To navigate to this screen, click on the name of one of the employees on the Employees screen.
The Inside Out Excel actions are:
- Upload Employees, which allows uploading records to the database using an Excel file;
- Download Sample File, which downloads an Excel file with the structure to be used when uploading new records;
- Download Employees, to download from the database the list of Employees.
Downloading Data
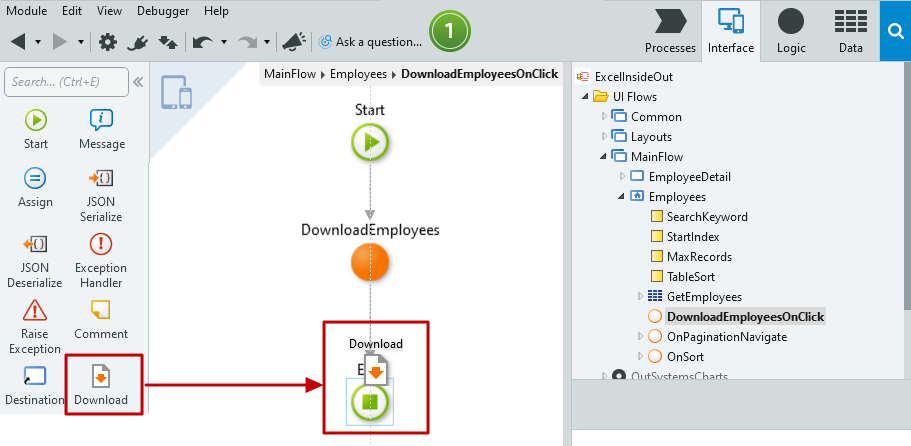
To download a list of records into an Excel file, we will need a button to trigger the action, a logic action on the screen (client action) responsible for the download process, and a Download tool to send the file to the user.

How to implement the Download process in an OutSystems Reactive app?
To download an Excel file with the data that is in your database, first, you need to open the screen where you want to implement this process on the Interface layer in the Service Studio, and then follow the steps:
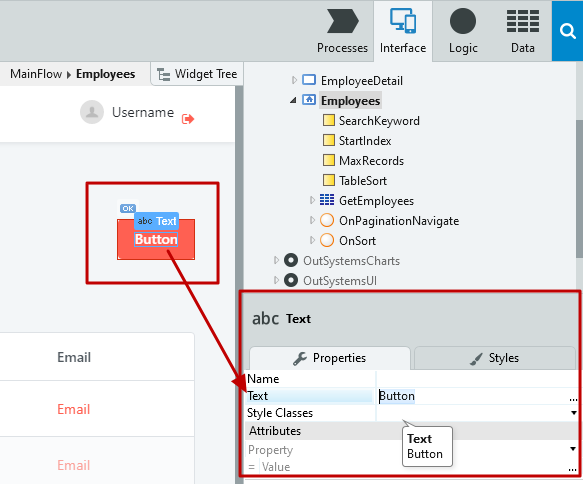
1. Drag-and-drop a new Button to the screen.

2. Change the Button text: in the Properties tab, click once on Text, and type Download Employees.
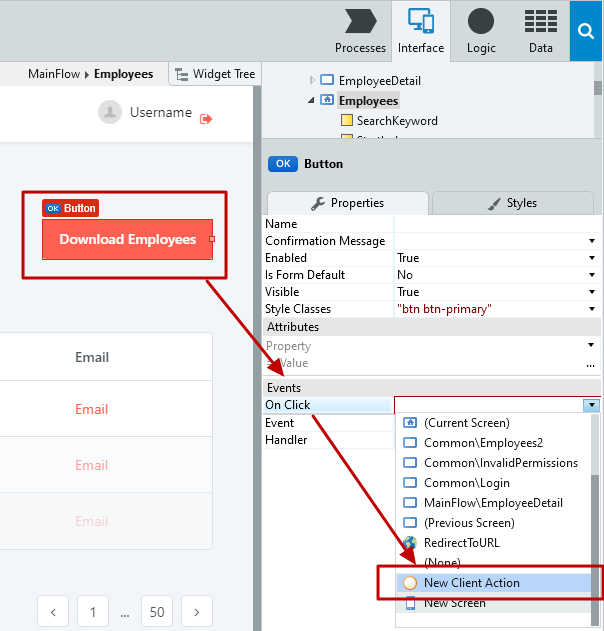
3. Now, associate an Action to the button that triggers an on-click event and launches the download process. To implement this, you have two options: double-click on the button to associate a new action to it or go to the On Click event in the button Properties and select the option New Client Action.
4. Inside your action flow, you will see a start and end node. To download an Excel file you need to run a query to return the records of all employees and generate an Excel file. We will implement this logic on the Server-side. Thus, drag-and-drop a Server Action in the middle of your flow, and select the option New Server Action.
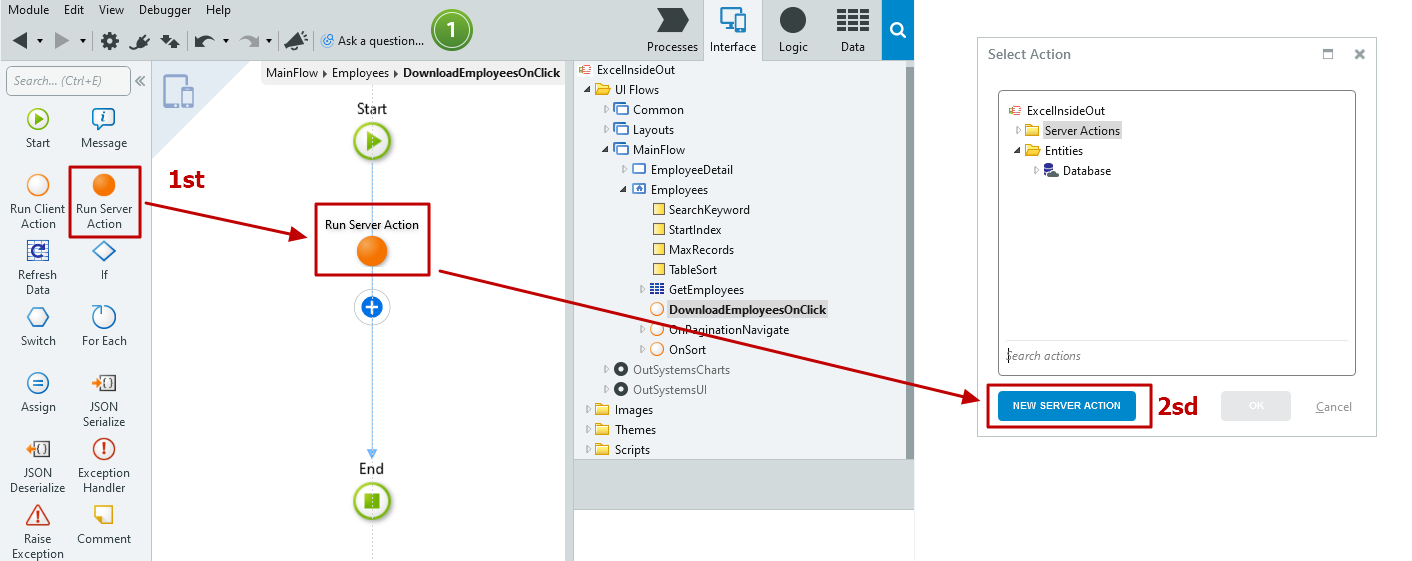
5. Your action will be created under the Logic layer: double-click on the Server Action to open it. Just as your Client Action, your Server Action has a Start and an End node. If you have questions about how Server Actions work, read the documentation. You can change the name of the Server Action to DownloadEmployees on the Action1 properties.

6. The DownloadEmployees Action returns a binary file with our Excel content. To return content from a Server Action, it must have an Output Parameter. Right-click on DownloadEmployees Action and select the option Add Output Parameter.
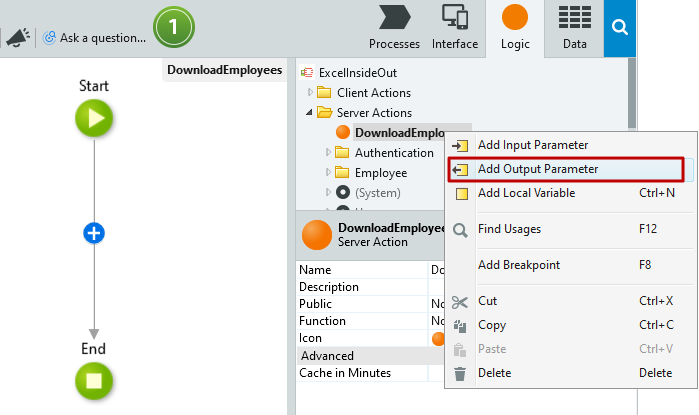
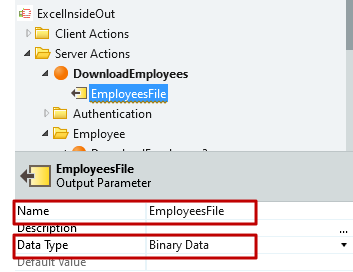
7. On the Output Parameter properties, change the Name to EmployeesFile and guarantee that the Data Type of this parameter is Binary Data.
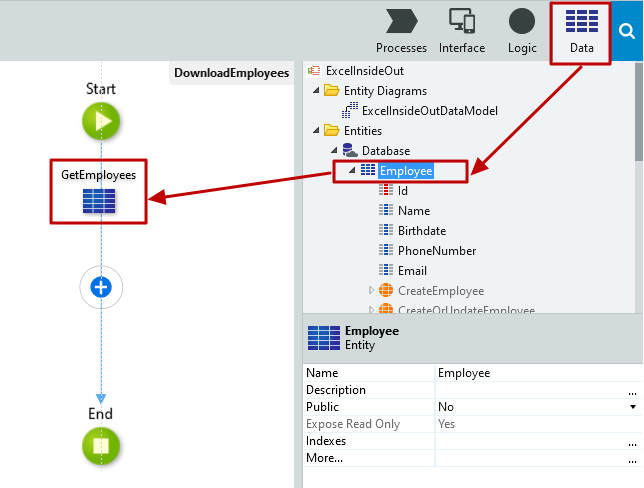
8. Next, to return the list of employees in your database, you need to run a query: go to the Data layer and drag and drop the Employee Entity to the DownloadEmployees Server Action.
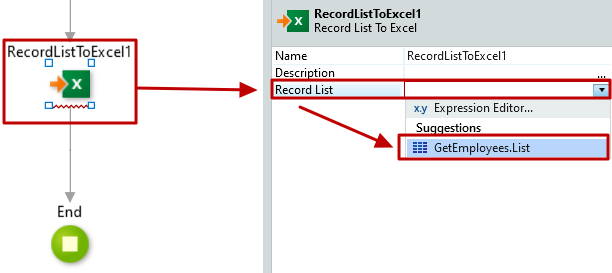
9. To download the Record List as an Excel File, we need to convert the Record List: drag-and-drop the Record List to the Excel tool to your action flow.

10. On RecordListToExcel1 properties, define the Record List source as the query created previously (GetEmployees.List).
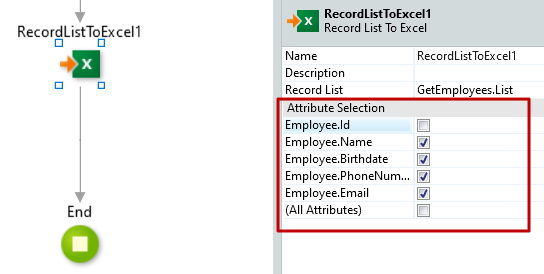
11. Now select which columns of the Employee Entity you want to retrieve. The Id is the primary key of our Employee Entity and is not a relevant column for the end-user, therefore, check all the other columns, keeping this one out.
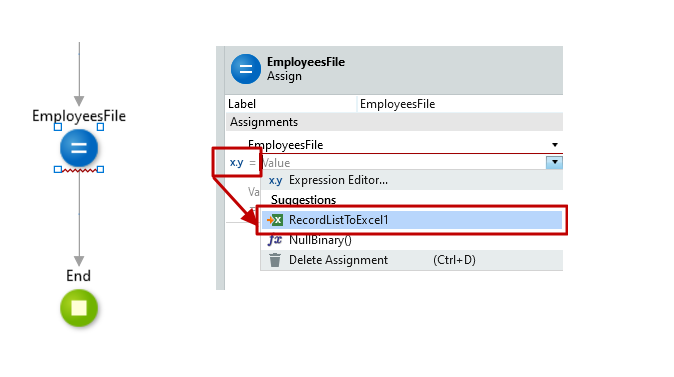
12. We now have the structure of the Excel file and need to return this binary data to the screen: drag-and-drop the EmployeesFile Output Parameter into the flow. This Action creates an Assign tool allowing to save the Record List into the Output Parameter, thus returning this value to the screen.

13. To save the Binary data, define the x.y Expression Value of the EmployeesFile Assign as RecordListToExcel1.
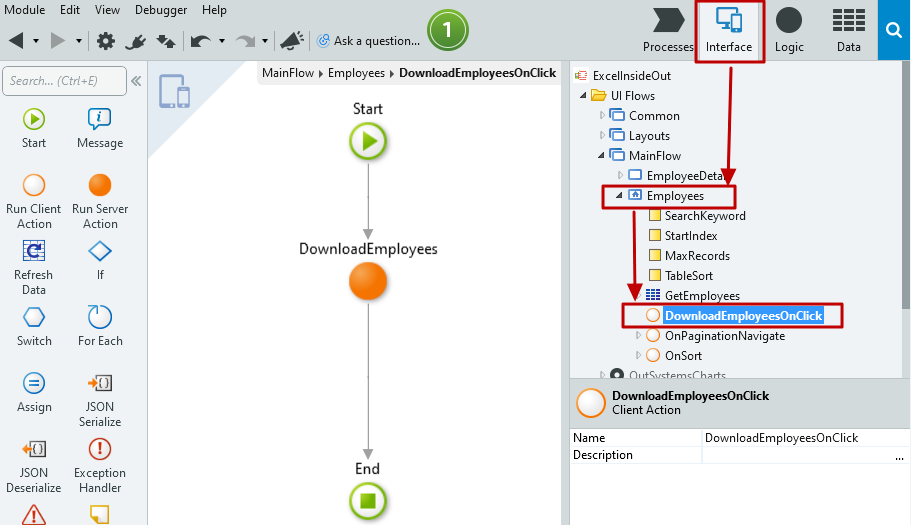
14. Your DownloadEmployees Server Action is now complete. Go back to the DownloadEmployeesOnClick Client Action inside your Employees screen under the Interface Layer.
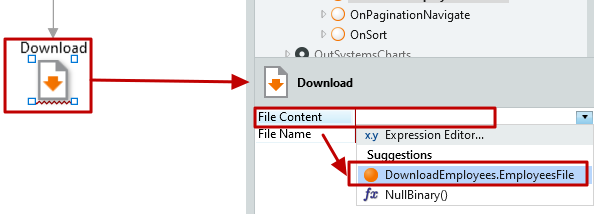
15. The DownloadEmployeesOnClick Client Action needs to end with a Download tool instead of an End node. Thus, drag-and-drop the Download tool above the end node. In that way, the platform will replace the End node for your Download tool.
16. Define the File Content property of your Download tool as the result of EmployeesFile Output Parameter of your Server Action DownloadEmployees. Select the suggestion DownloadEmployees.EmployeesFile.
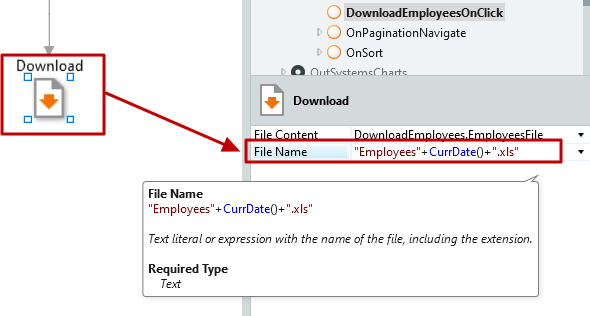
17. To complete the process, define what will be the name of your Excel file. As a best-practice, I recommend the concatenation of “Employees”, plus the current date (you can use the OutSystems Built-in function CurrDate() ), and the extension of your Excel file “.xls”.
Congratulations, your Download process is now complete!
Upload Data
To upload a list of records from an Excel file into the database, we need: an upload tool to receive the Excel file; two variables, one to save the Excel binary data and another to save the File Name; a button to trigger the Upload action; a logic action on the screen (client action) responsible for the upload process; and a Refresh Data tool to refresh the table on the screen with the new data.

How to implement the Upload process in an OutSystems Reactive app?
To upload an Excel file to your database, firstly, open the screen where you want to implement this process, on the Interface layer in the Service Studio, and:
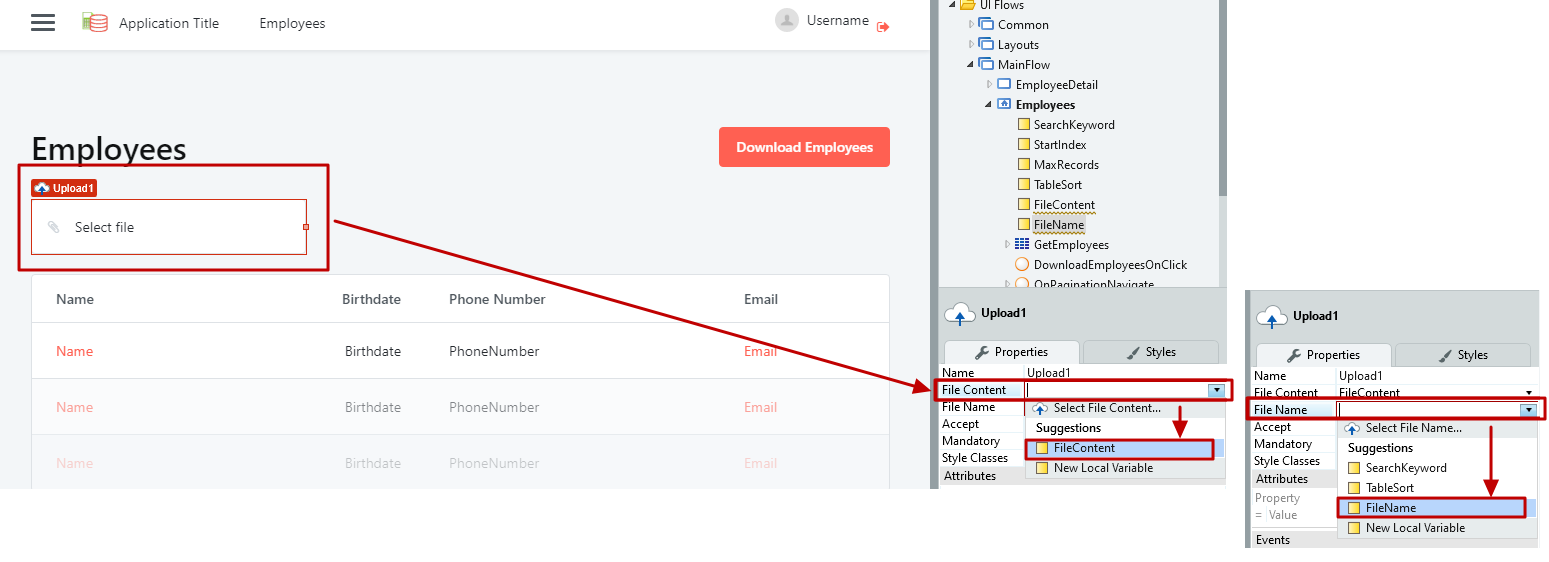
1. Search for the Upload tool and drag-and-drop it into your Employees Screen.

2. The Upload tool has two properties that need to be bound to a Local Variable of your screen: File Content and File Name. The File Content will save the Binary Data and the File Name will save the Name of your Excel File.
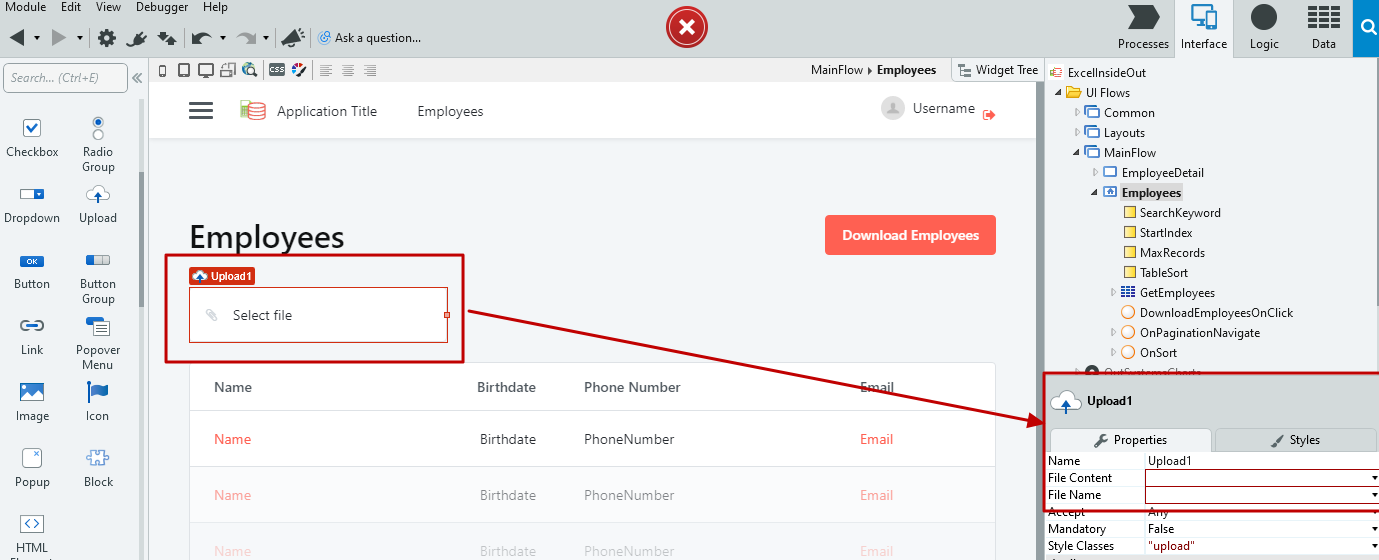
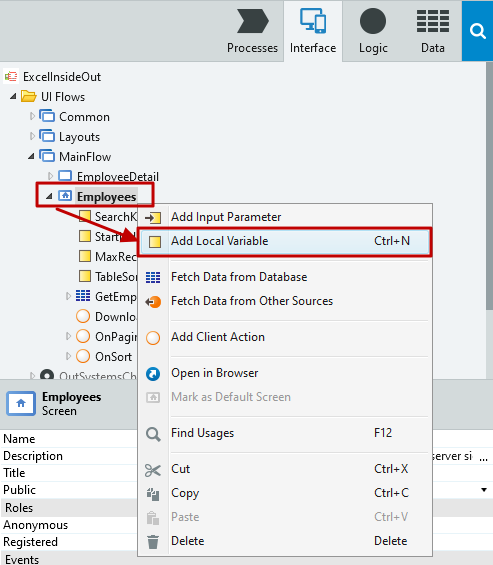
3. Add two new Local Variables by right-clicking on Employees Screen and selecting the option Add Local Variable:
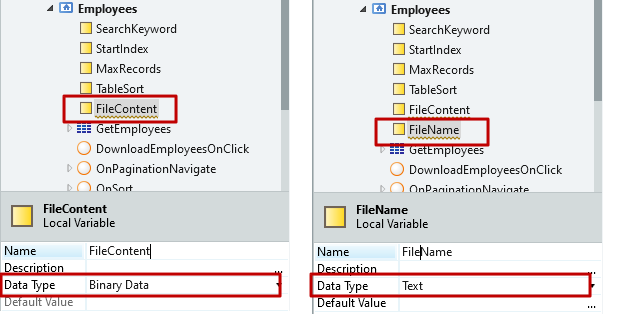
- File Content, of type Binary Data;
- File Name, of type Text.
4. Associate each one of the Local Variables to the respective Upload tool properties.
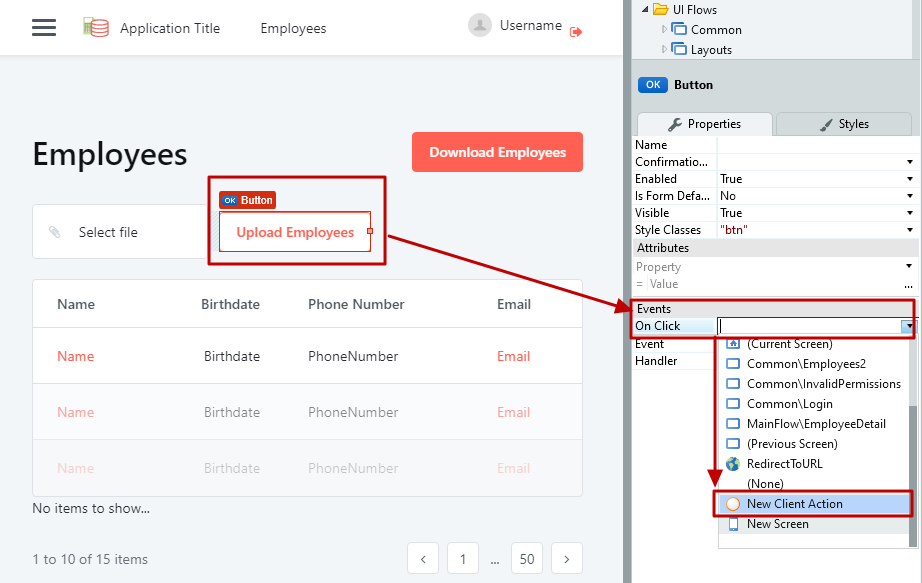
5. Drag-and-drop a new Button to your screen.
6. Change the Button text to Upload Employees: click once on the text, and on the properties, type the new text.
7. Next, associate an Action to the Button that triggers an on-click event and begins the upload process. There are two options: double-click on the Button to add a new Action to it, or go to the On click event in the button Properties and select the option New Client Action.
8. To add the records inside the uploaded Excel file to the database, convert the Excel File to a Record List and, for each one of the Records, trigger a CreateEmployee Action. This Action is responsible for executing an INSERT record into your database. This logic is implemented server-side: drag-and-drop a Server Action into the action flow, and select New Server Action.
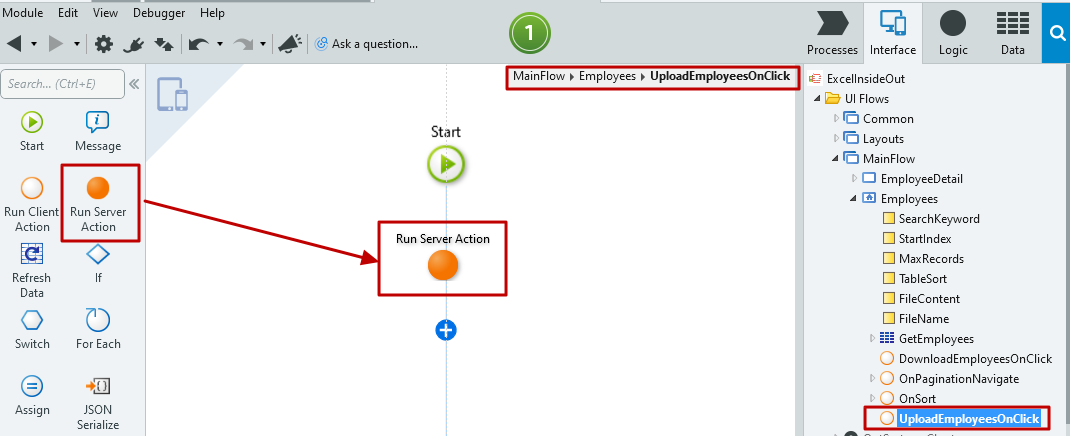
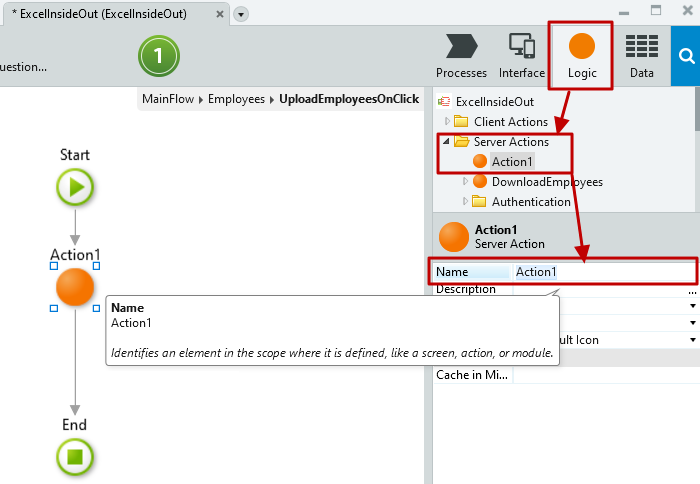
9. This Server Action will be created under the Logic layer. Double-click on it to open. If you have questions about how Server Actions work, consult the documentation. Change the name of the Server Action to UploadEmployees on the Action1 properties.
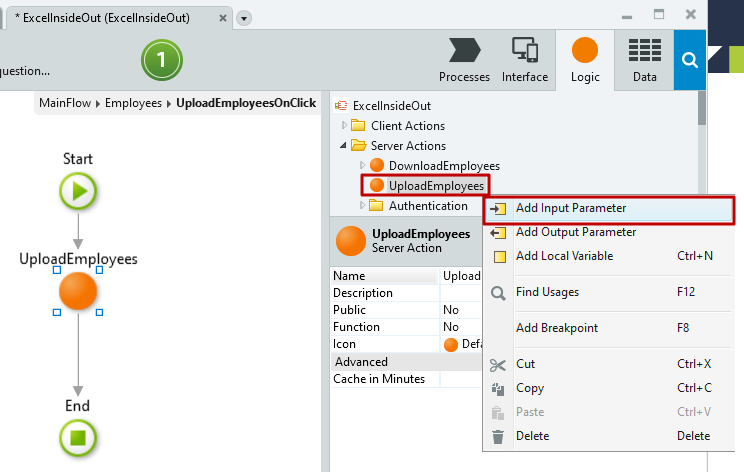
10. The UploadEmployees Action receives a binary file containing the Excel contents and saves the records into the database. To receive the content, add an Input parameter: right-click on the UploadEmployees action and select the option Add Input Parameter.
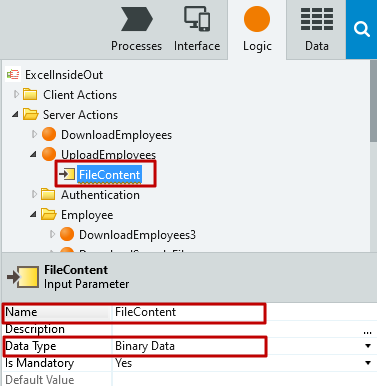
11. On the Input Parameter properties, change the Name to FileContent and guarantee that the Data Type is Binary Data.
12. To upload the Excel file as a Record List, convert it to a Record List: drag-and-drop the Excel to Record List tool to your action flow.

13. On your ExceltoRecordList1 properties set the Record Definition and the File Content.

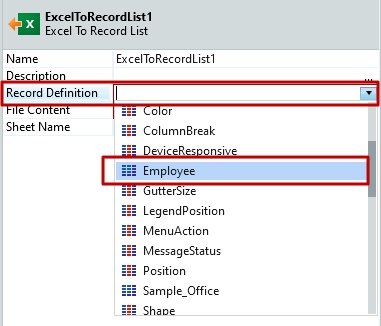
14. The Record Definition maps the Excel columns structure to the Record List that you are trying to create with the conversion tool. Considering that you are saving an Employee record list inside the Employee Entity, and your Excel file respects the same number and type of columns of the Entity, use the Structure of the Entity as a Sample of the Record Definition.
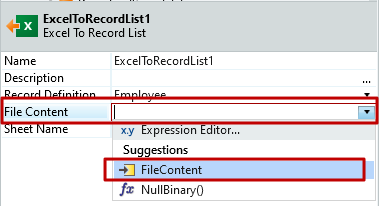
15. The File Content properties receive the uploaded Excel file. Thus, the Content is sent to the UploadEmployees Server Action through the File Content Input Parameter. Select the File Content Input Parameter as the File Content property.
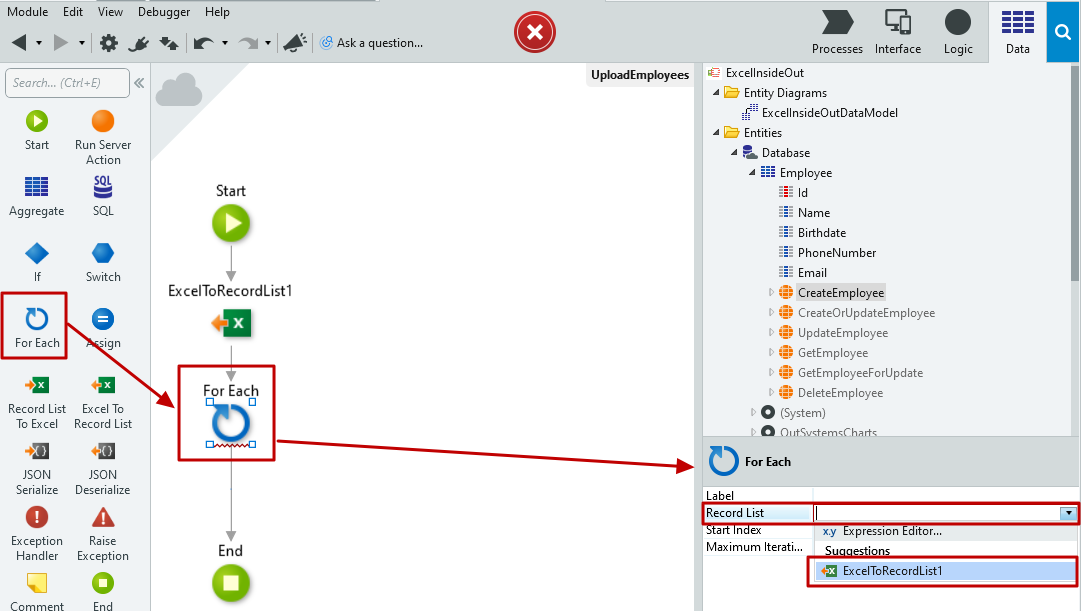
16. In this step, the Excel Record List is ready to be saved into the database. This will be done for each one of the rows (records) of the Excel File. To iterate through the Records List, drag-and-drop the For Each tool to the action flow and set the source of the Record List property of the For Each as the ExcelToRecordList1.
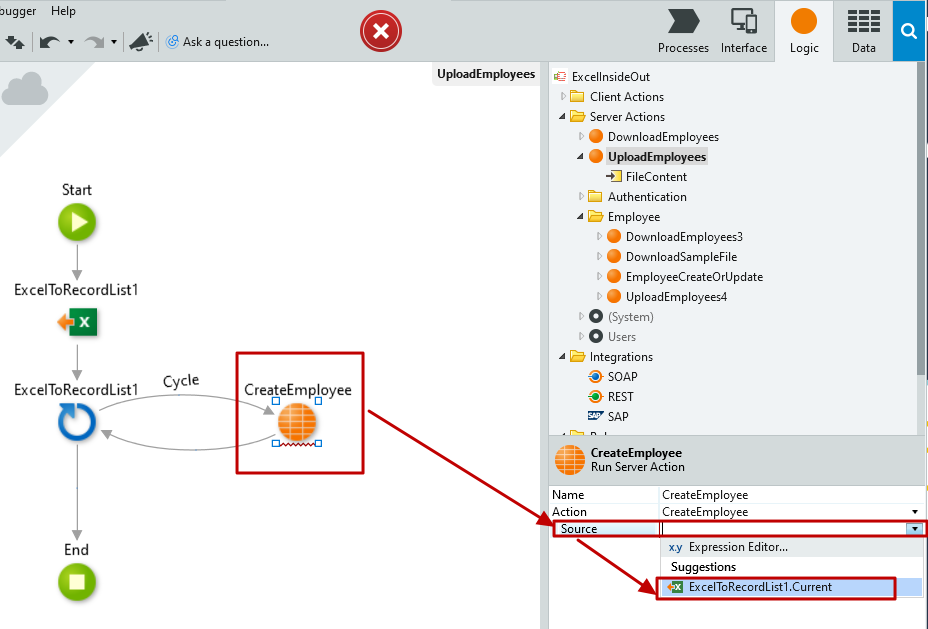
17. To execute the INSERT SQL syntax, you can use the Database Actions that the platform automatically creates. Go to the Data Layer, under Database, and look for the CreateEmployee Action inside the Employee Entity. Drag-and-drop the CreateEmployee Action to the right-side of the For Each tool in the action flow.
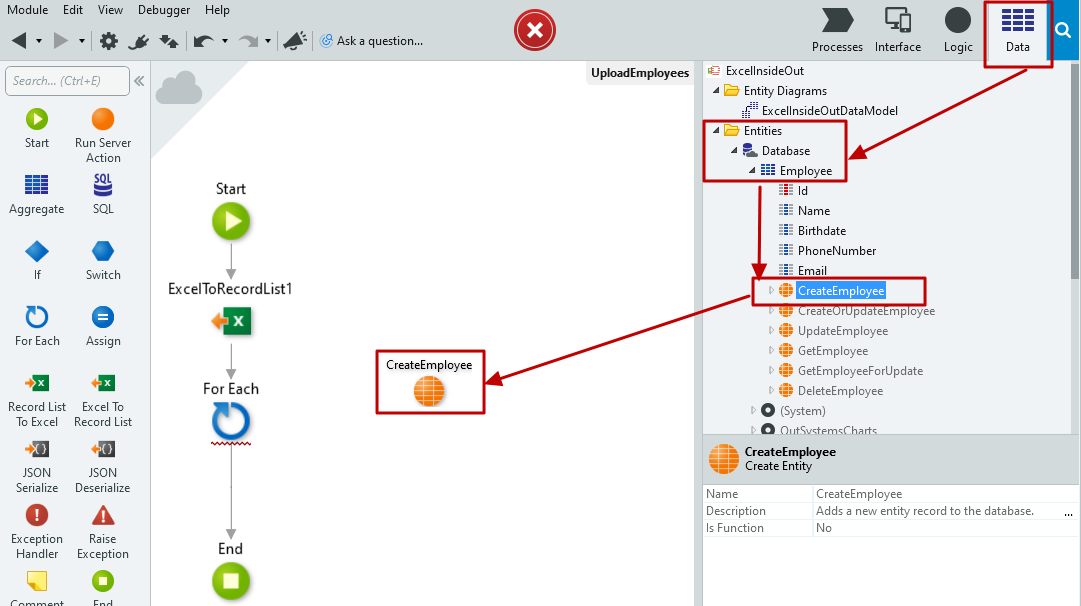
18. Now, let’s link the For Each tool to the CreateEmployee Action: left-click on the For Each Tool and drag the Cycle arrow until it reaches the CreateEmployee Action; and, to close the cycle, left-click on the CreateEmployee Action and drag the arrow until it reaches the For Each Tool.
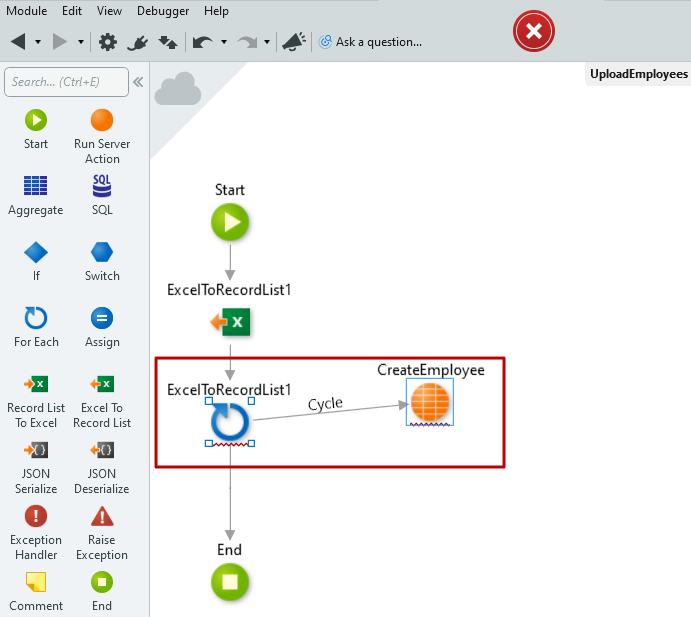
19. The CreateEmployee Action is expecting to receive an Employee Record to insert into the database. In the Source property of the CreateEmployee Action, set the Source as the ExcelToRecordList1.Current. The Current element of the Record List points to the current record being iterated in the For Each cycle.
20. The UploadEmployees Server Action is now complete. Go back to the UploadEmployeesOnClick Client Action inside the Employees screen under the Interface Layer.
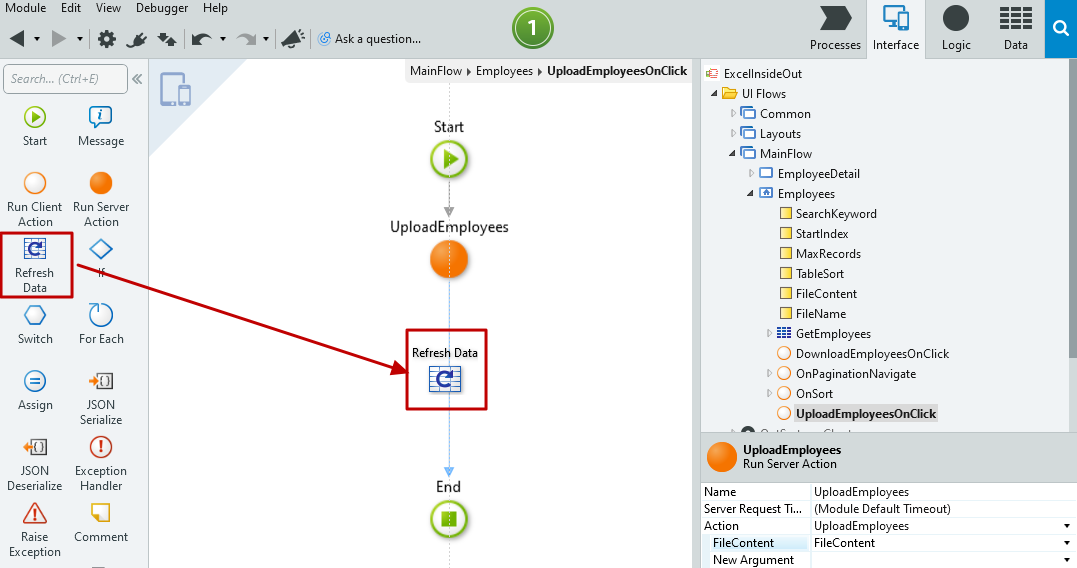
21. The UploadEmployees Server Action needs to receive the File Content from the Screen. On UploadEmployees Server Action properties on your UploadEmployeesOnClick Client Action, set the File Content property as the File Content Local Variable of the screen.

22. To complete the process, the Action can request the platform to refresh the data being displayed on the screen, with the new records: drag-and-drop the Refresh Data tool under the UploadEmployees Server Action in the UploadEmployeesOnClick Action.
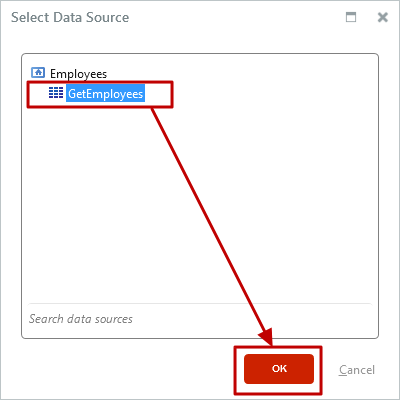
23. The platform will open the Select Data Source window: select the GetEmployees query (Aggregate) to be refreshed. This Aggregate is responsible for returning the list of employees that are being displayed on the screen.
Congratulations, your Upload process is now complete!
What else?
Do you want to upload sample data during your design time?
OutSystems has some accelerator processes that help upload an Excel File or even create Entities based on an Excel file, called Bootstrap. If you are interested in this subject, I recommend the documentation below:
Foreign Keys act as a cross-reference between tables since it references the primary key of another table. In OutSystems, the Foreign Keys are called Reference Attributes.
Are you interested in learning more OutSystems patterns?
In case you are interested to learn more OutSystems patterns and consolidate your knowledge about the Platform, I recommend the course below:
This course introduces you to the OutSystems Reactive and also offers you a Consolidation module of more than two weeks of exercises, projects, and presentations.
Forge components
The OutSystems Forge is a repository of reusable, open code modules, connectors, UI components, and business solutions to help speed up app delivery time. So instead of invented the weal, you can reuse components to improve your database performance and logic.
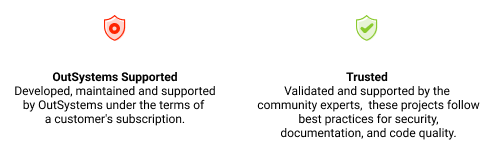
One important thing to have in mind is to be careful when choosing a Component or Plugin to install in your environment. Try to check for OutSystems Supported or Trusted components, like a display in the image below. And also inspect and test the code before sending it to production.
Below you can find a list of links to available components that help you improve the features or logic of your Excel Files, Upload, Download, and preview documents:
- Excel Files
- Upload and Download Files
- Web Previewer
- this component allows previewing documents, PDFs, or images that exist as binary data in the database without downloading the file. It might be useful previewing an XLS (Excel) without downloading it.
- https://www.outsystems.com/forge/component-overview/1281/web-previewer
Of course, there are many more. If you would like to explore other components or plugins to improve your Excel features, expand your search on the Forge.
Conclusions
It is possible to Upload and Download Excel data in an OutSystems Reactive application. As shared, you can insert records in your database in runtime by uploading an Excel File or even downloading your database data into an Excel File. However, there are many more concepts, improvements, and best-practices. And the good part is that you are not alone in this journey to gain advanced knowledge on these concepts. Take advantage of the comprehensive documentation, top-notch courses, and also the support of the OutSystems community. And remember, you can also be an active part of the community by giving your support and fresh ideas to improve the ‘Excel Inside Out’ world in OutSystems.
References
[1] Walkenbach, J. (2015). Part I: Getting Started with Excel. In Microsoft Excel 2016 Bible (1st ed., p. 12). John Wiley & Sons, Inc. ISBN: 978-1-119-06751-1